Downloads

pink dots icon

Download SOPHiA DDM

SOPHiA DDM® is the platform of choice for clinicians performing routine diagnostic testing. It integrates features facilitating variants visualization and interpretation while assuring protection of clinical genomic data. This platform reduces the complexity of determining the pathogenicity of genomic variants analyzed by SOPHiA AI. It helps hospitals better and faster diagnose patients in the five following areas: Oncology, Metabolism, Pediatrics, Cardiology and Hereditary cancers.

Note: Information in parenthesis represents our recommended requirements. Please select the server closest to you.

Minimum System Requirements

Operating System

  • Microsoft Windows 7(64 bit) or later
  • Microsoft Windows 10(64 bit) or later
  • MacOS 10.14 (Mojave) or later

Internet Connection

At least 10 MiB/s (recommended 20 MiB/s) download and upload speed

You can test your connection to our servers here:

Please note that the user must have Windows Administrator rights to install SOPHiA DDM.

Hardware

200MB(1GB) disk space for the installation

4GB(8GB) RAM or greater

Troubleshooting

Error Message

If you receive the following error message when running SOPHiA DDM

Still The program can’t start because ‘XXX’ is not installed on your machine

please download and install the following updates:

Windows SOPHiA-DDM-v4-4.6.2 Download Link
MacOS-SOPHiA-DDM-v4-4.6.2 Download Link

If you see DDM Report Summary with one or more failed reports when running SOPHiA DDM

Please verify that you are connected to the internet and verify the following:

Configure your proxy

Proxy configuration

SOPHiA DDM will try to detect automatically your proxy configuration based on the computer’s network settings. Unfortunately, some proxies cannot be properly identified and you might encounter problems connecting. If this happens, you can define the proxy configuration and force SOPHiA DDM to use it.

To manually configure your proxy, create a file in C:Usersuserfolder.dg-cacheproxyCfg.txt with the following text:

-Dhttps.proxyHost=YOUR_PROXY_ADDRESS
-Dhttps.proxyPort=YOUR_PROXY_PORT
-Dhttp.proxyHost=YOUR_PROXY_ADDRESS
-Dhttp.proxyPort=YOUR_PROXY_PORT

If the proxy requires authentication, the user will be prompted upon startup to introduce the credentials.

Configure your firewall

Your IT department should update the rules to open access to our servers.

*.sophiagenetics.com:443

Allow Sophia DDM application through Windows Firewall. ( Even if a third party antivirus is not installed Windows comes default with one. )

If you need further assistance, contact our support team at [email protected] or view our frequently asked questions.
pink dots icon

Download the Background Uploader

The Background Uploader allows user of SOPHiA DDM™ to upload data for analysis without the need to keep a web app session open and logged in. The utility can be installed on a windows or Mac computer that has access to the data files, then invoked by users on the web application. The background uploader will then take over the upload operation and users will be free to log out of the web application session. 

Minimum System Requirements
Operating System

Microsoft Windows 10(64 bit) or later
MacOSX 10.0 or later

Internet Connection

> 2Mb/s Download/upload speed internet connection
You can test your connection to our servers here:

FRENCH USERS
AUSTRALIAN USERS
DUTCH USERS
US USERS
BRAZIL USERS
TURKISH USERS
CANADIAN USERS
SWISS USERS

After downloading the file, double click to install. After successful installation, the following icon should be visible on your taskbar:

Configuration

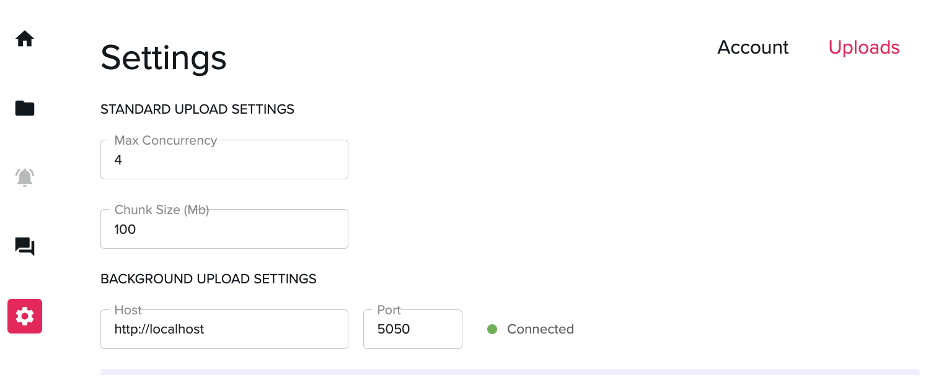
Once installed, configure your settings on your browser to utilize the installed Background Upload Utility by

  1. Logging into SOPHiA DDM™
  2. Navigating to your account settings
  3. Selecting the “Upload” section
  4. Enter the value http:// as Host value (where is the name or IP address of the computer where the Background uploader was installed, http://localhost if the background uploader is installed on the same computer as the browser)
  5. Enter the value 5050 as the Port number value

After completing these steps, the icon next to the Port Number should turn from red to green, and say “connected”

Please note that configuration must be repeated each browser that are used to create analysis requests. Deleting browser cache may delete configuration settings and require configuration to be repeated

If you need further assistance, contact our support team at [email protected] or view our frequently asked questions.

';